Sunday 22 August 2010

11-3: Using TrueCrypt

11-3: Using TrueCrypt

For this practicals, we will be using third party applications that can be downloaded to protect files with cryptography.

Download the application from here.

After downloading, install the program.
Run TrueCrypt and click No to skip tutorial.
Click 'Create Volume'.


Select 'Create an encrypted volume file container'.


Click Next until Volume Size.
Put Volume Size as 1MB and click Next.


Click Next till you reach Volume Format.
At Volume Format, move your mouse for at least 30 seconds to ensure that you will get a strong encryption keys.
Click Format and we have done creating the volume.


Now we are going to mount the contain as a volume.
At the main windows, select an empty drive letter.
Click 'Select File' and navigate to where the container is saved.
Click 'Mount'.
You should get the end result as the picture below.


Remember Encrypted.docx and Not Encrypted.docx?
Save this two files into the TrueCrypt container.
Open them from the container.
Is there a differences in the time to open these two files?
After you are done with this, click 'Dismount' to stop the container.

I think this is quite safe as this is like a hidden folder to keep files just that in this case it is a hidden volume. It also encrypts files that are placed in this volume.
11-2: Using Microsoft's Encrypting File System (EFS)

11-2: Using Microsoft's Encrypting File System (EFS)

In this practical, we will be learning how to use Microsoft's Encrypting File System
(EFS).

EFS enables files to be transparently encrypted to protect confidential data from attackers with physical access to the computer. (Wikipedia)

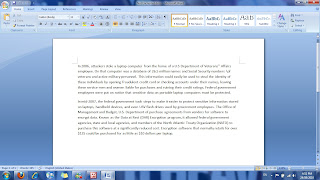
First, create a Word document with the following text in the below picture.

Save the document as Encrypted.docx and another time as Not Encrypted.docx

Right click the Encrypted.docx and click properties.
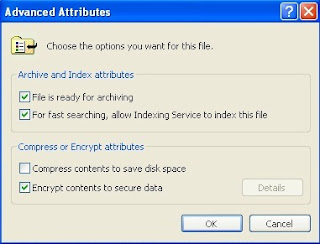
Click Advanced button in the properties window.
Tick the 'Encrypt contents to secure data'.


Now open both documents.
Which document open fast?
Was there a delay opening Encrypted.docx?

11-1: Installing Hash Generators and Comparing Hashes

11-1: Installing Hash Generators and Comparing Hashes

In this practical, learn about different hash generators that generate different hash values and compare them.

First, go to http://md5deep.sourceforge.net/
Download md5deep.
I suggest you download into a easily accessible place as this practical would use command prompt.

Extract the contents in the file.
Then create a Word document with content inside, "Now is the time for all good men to come to the aid of their country."
Save this file as Country1.docx in the same folder as the extracts of md5deep.

Using command prompt, navigate to the place where you store the extracted files.
Type in md5deep Country1.docx and press enter.
It will show you the hash value of Country1.docx
Next, try md5deep md5deep.txt and press enter.
It will show you the hash value of the md5deep.txt
Next, remove the line you typed in Country1.docx and save it as Country2.docx
Do the same step as what we did for command prompt for Country1.docx
It will generate the hash value of Country2.docx


We can go on to try the other hash generators.
Example, type in sha1deep for SHA-1
sha256deep for SHA-256
whirlpooldeep for whirlpool

From trying all these different generators, I see that the length of each hash value generated by the different hash generators are different. They also use a hexadecimal number system for the hash values.

8-5: Use an OpenID Account

8-5: Use an OpenID Account

Continuing from the previous practical of creating an OpenID account.

Started off with going to livejournal.

Inside the text box which ask for your OpenID, type in your OpenID and click login.


Then it will ask you to verify whether that is your OpenID and just click allow.


Then for the next website.
It would be here.
Just do the same steps as for how we did for livejournal.


I think this is great as we do not need to type in our passwords to login if we are afraid that the website have keyloggers.

8-4: Create an OpenID Account

8-4: Create an OpenID Account

This practical and the next practical are closely related.

First, go to https://pip.verisignlabs.com/.
Click get started and create an account.

Under My Account, this is where you find your OpenID.

8-1: Use Cognitive Biometrics

8-1: Use Cognitive Biometrics

For this practical, we would be learning on using cognitive biometrics.

First, I went to http://www.passfaces.com/demo/.
You do not need to key in any information in order to enroll.

At introduction to passfaces, click next until you get to this page below.


At that page, try to remember the 3 faces that they have given to you. These 3 faces would be like your password.
After memorizing, click next.

You will come to a page with 9 faces.
Now, try to find the face that you memorized.
Only one out of the nine faces is the correct face.
When you get the correct face, you would go on to the next set of faces.
However, if you made a mistake, you would have to start all over again.


I find it as a well secure method instead of using passwords to enter accounts but in this demo that I have done, if I cannot remember the face, it would slowly give me hints like shaking the picture of the correct face. This would be like revealing to the hacker of which is the correct "password".

7-2: Download and Install a Password Storage Program

Practical 7-2: Download and Install a Password Storage Program

In this practical, I would be learn how to use a Password Storage Program.
A password storage program is used to store all your passwords for any accounts that you have so that you would not need to memorize all of them.

First, I went to http://keepass.info/.
And download and run the installation file.
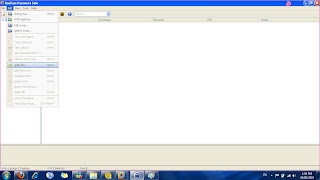
After installing the program, run it and click file then new.
A new windows box would appear.
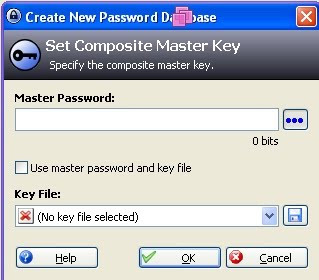
This window box would ask you to have a master password.
This master password would allow you to access your database of all your passwords.


After setting the master password, a new window box would appear.
This would be the database of all your passwords.
Under edit, click new entry.


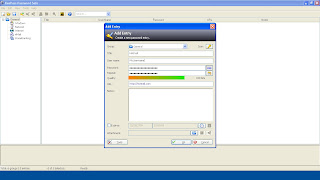
Another window would appear.
This time fill up the information they ask.
For example we want to fill in information on our hotmail account.
Lets say for under title, we call it hotmail.
Then for username, would be our username.
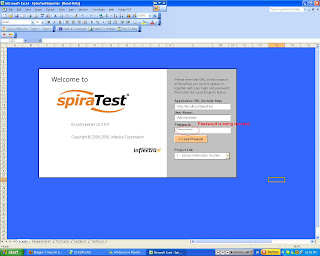
And so on and so forth.
This is shown in the picture below.


When you are done with the settings, click ok.
Now we have come to the easiest part.
Under URL, just double click it and it would open the web browser to the website.
All you have to do is to click your username and password on the keepass program and drag it into the respective text box at the website.
That's all for this practical.

7-1: Using Rainbow Tables

In this practical, I would be using Ophcrack which is an open-source password cracker program that uses rainbow tables.

What is rainbow tables?

A rainbow table is a lookup table offering a time-memory tradeoff used in recovering the plaintext password from a password hash generated by a hash function, often a cryptographic hash function. (Wikipedia: Rainbow Tables)

Doing this practical, I download ophcrack from here.

During the installation of the program, they will ask you to download and install the "tables".
Download the "table" that correspond to your version of Windows.
The "table" would appear inside the black box of the ophcrack.


Next go to http://www.objectif-securite.ch/en/products.php
Scroll down and under Demo.
At the password text box, type in the password as 12345 and click submit.
This would generate a hash of your password.
A hash would be made up of a string of letters and numbers.


Now, back to the ophcrack, click the Load icon and click the single hash option.
Copy your hash that was generated at the website and paste it into the text box at the Single hash option.
Then click ok and let the program run.


Depending on the complexity of your password would determine the amount of time it would need to crack your password.
If it is as simple as this example "12345", it will take seconds to crack it.


This is useful to test out your password to see how "strong" your password is.

Thursday 3 June 2010

4.3

Practical 4-3: Hosts File Attack

In this practical, I am going to learn what is a hosts file attack.
It is by substituting a fraudulent IP address by either attacking the Domain Name System (DNS) or local host table.

First, I run notepad using the administrator account.
Next I open the hosts file which is located at C:\WINDOWS\system32\drivers\etc.
At the bottom of the file, I type in 74.125.47.99 followed by pressing tab and typing www.course.com
This is the IP address of Google.

In doing this, when a users types in www.course.com, it will link to google through the use of Google ip address.

4.1

Practical 4-1: Using the Wireshark Protocol Analyzer

First, download wireshark from www.wireshark.org
Install it.

A protocol analyzer (Also known as a sniffer) captures packets to decode and analyze one or more protocols into a human-readable format for the network administrator. It can also store packets on disk for further analysis later on.
http://www.answers.com/topic/packet-sniffer

In this practical, I am going to connect to a fake FTP connection.

Run the wireshark.
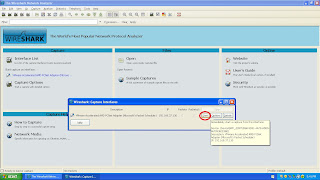
Click Capture > Interfaces > Start


Go to Start, type cmd and press enter.
Type ftp server1.
Packets will then appear on the wireshark.
Type exit and press enter and close cmd.

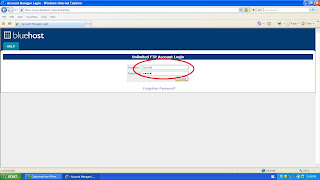
Open IE and go to www.bluehost.com/cgi-bin/uftp
Type in Gerald in username and happy for password.
It will display invalid as it is a fake account.


Then I went back wireshark and search for Gerald. And the information of bluehost.com is been found.

I think that this is actually most dangerous tool as it actually shows packets of information in forms of codes to the attacker.

3.3

Practical 3-3: Set Web Browser Security

This practical requires Windows Internet Explorer (IE) Version 7 Web browser and above to do.
Through this, I will learn how to do various security settings on the browser which can help protect my computer from the different threats out there on the net.

The security settings I would be doing are the cookies, Add-ons, Security Zones, Restricted Zones, privacy level and pop-up blocker.

Cookies

Tools > Internet Options > General Tab > Browsing History > Settings > View files


(Figure 3.2.1)

It has different kinds of information like where the user frequently browse which hackers can make use of to upload viruses on these websites without the knowledge of the user who is surfing the website.

Add-on

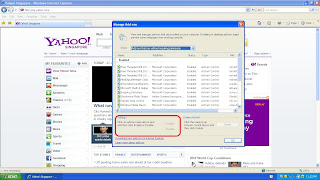
Tools > Manage Add-ons

Add-ons are additional programs that are needed to run things like media applications and other applications on the web browser. Examples of these are Java and Javascript. These settings allow user whether to enable/disable the add-ons used on the web browser.

(Figure 3.3.2)

As shown in the red box in Figure 3.3.2, this is where users can enable/disable the add-ons.

Security Zones

Tools > Internet Options > Security tab

Moving the slider of the Security level for this zone allows various settings.

Medium - prompts before downloading potential unsafe content and unsigned ActiveX controls.
Medium-high - Appropriate for most websites, prompts before downloading potential unsafe content and unsigned ActiveX controls.
High - Appropriate for websites that might have harmful content, maximum safeguards and less secure features are disabled.


Figure 3.3.3

This is where user would do their own custom settings for security zones.

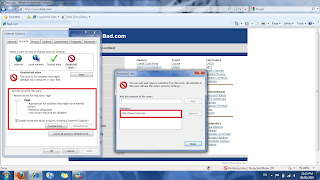
Restricted Zones


Figure 3.3.4

When a website is added to the restricted zones, the next time the user enters that website, the security levels would automatically change to the High security level so that it is able to prevent malicious activity from happening.
Privacy Level

Tools > Internet Options > Privacy


Figure 3.3.5

It helps block cookies from being seen by other websites who try to use this to know peoples' browsing habits.

Pop-up blocker

Tools > Pop-up blocker > pop-up blocker settings


Figure 3.3.6

As what is name suggest, it is used to block unwanted pop-ups that the user does not want to receive. User can adjust the settings to set whether they want all the pop-ups to be block.

3.2

Practical 3.2: Test AV Software

First, as I was using VMware to do practical 3.2, my windows xp did not have any antivirus.
So I went to download a a antivirus.
After downloading that, I went on to do the practical.
I went to http://eicar.org/anti_virus_test_file.html and tried to download the file eicar.com
This file contains a fake virus so before downloading it, my av software detected it and prevented me from downloading it.


Next, I tried to download eicarcom2.zip. As it is a zip file, my av software did not detect that it was harmful. After downloading, right click the file and scan for virus. The av software detected a virus and remove the file.


AV software is a must for computers as it comes in handy to detect virus when running files.

Sunday 30 May 2010

2.5

Practical 2-5: Download and Install VMware Workstation

For this practical, I would be using a different software. It is the VMware Workstation.
VMware Workstation is used for creating and using virtual machines. I have already know how to use Vmware Workstation as I have used it a few times.

VMware Station is a useful software as it allows users to save space, cost and time getting another computer. It is useful in cases like testing unknown software/anti-virus protection. If the server is affected, it can just be closed by the user.

VMware Workstation can be downloaded from www.vmware.com and located under Downloads.

To create a virtual machine:
File > New > Virtual Machine > Typical Setup > Choosing OS > Filling up required information of the OS planning to install.

2.4

2.3

Practical 2-3: Block a USB Driver

Blocking USB drive is to use third-party software to control USB driver permission.

First I went to http://www.irongeek.com/i.php?page=security/thumbscrew-software-usb-write-blocker.
After downloading, I unzip the file and run it. (An icon appears at bottom left of task bar)

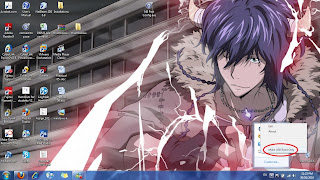
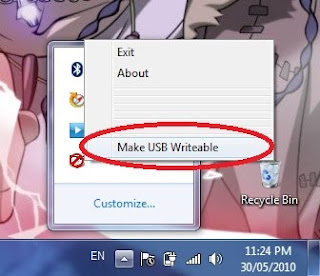
After transferring file from documents to thumbdrive, I click the new icon at task bar and select 'Make USB Read Only'.
This prevents files from being transferred to the USB Drive or files being edited. It only allows files to be read.

This second picture shows how to make the USB drive writeable.
'Writeable' means that it allows files inside the USB thumbdrive to be edited, transferred in/out of thumbdrive and to be read.

This tool is very useful.
It helps prevents files from being transferred out of the laptop incase when the user is not around. However, it is very easy to be disabled if a user has encounter this before.

2.2

Practical 2-2: Use a keylogger

First I went to www.softdd.com/keystrokerecorder/index.html to download the keylogger.
After download, I installed the keylogger.

This practical would show me the use of a keylogger and by the end of this practical, I would roughly know the dangers of the use of a keylogger.

First, I run the program, it would ask for a password. Just click ok twice.
Tick the checkbox, 'Always run (Ignore start time)'
Activate the keylogger by clicking the activate/start button.


Now I went to do a fake email checking.
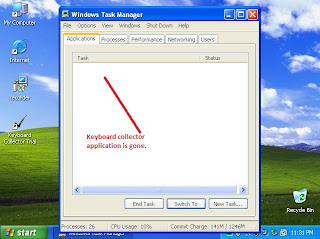
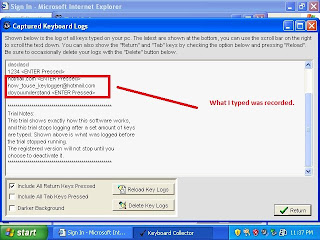
I click the keyboard collector again. This time I deactivate it and click view log.


Things learn.
Keylogger can be placed and run at any computers without the user knowledge.
Do not view files and accounts that require sensitive passwords.

2.1

Practical 2-1: Scan for Rootkits using RootkitRevealor

Rootkit - A set of software tools used by an intruder to break into a computer, obtain special privileges to perform unauthorised functions and removing all traces of it.

In this practical, I would be using a rootkitrevealor and learning how to use it.
First, I went to http://technet.microsoft.com/en-us/sysinternals/bb897445.aspx to download the rootkit revealer.
I extracted the file and run it.
When it is running, accept the Rootkit License Agreements.
It looks like other scanners just that this is for rootkits.
Click file then scan.
It will display discrepancies between the Windows registry keys and other parts of the registry. Any discrepancies does not necessarily mean that a rootkit is detected.

1.4

Practical 1-4: Scan for Malware Using the Microsoft Windows Malicious Software Removal Tool.
From reading the title of this practical, it is obvious that we would be doing a scan of the computer.

First, I go to http://www.microsoft.com/downloads/details.aspx?FamilyId=AD724AE0-E72D-4F54-9AB3-75B8EB148356&displaylang=en.
This is the microsoft download centre for the Malicious Software Removal Tool.
I save the file to my desktop.
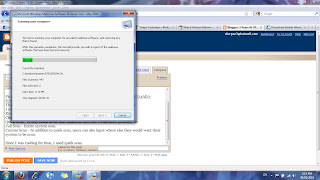
Run the file and a dialog box would appear.
Click next.
Quick Scan - It only scans areas that malicious software would most probably be.
Full Scan - Entire system scan.
Custom Scan - In addition to quick scan, users can also input where else they would want their system to be scan.

Since I was rushing for time, I used quick scan.

The scan would last around 1-2mins.


Scan completed and there is no malicious software detected.

1.3

Project 1-3: Inspection for Insecure Versions of Applications Using Secunia Software Inspector

For this practical, I would be using Secunia Software Inspector to check for applications that are not patched. Nowadays, unpatched applications softwares programs are increasingly becoming targets of attackers.

First, I go to http://secunia.com/vulnerability_scanning/online.
This websites runs a scan of your computer for any unpatch applications. It will alert you of the programs that your computer have which are not patched and will give you links of which for you to download patches to the applications.


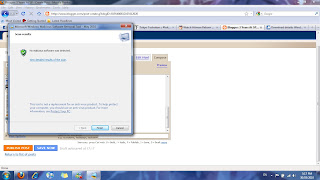
This picture above shows that it has applications that are unpatched and it also provides the link for the user to go to download it.


However, for this picture, all of its applications have been patched.

Overall, I think that the software inspector is an excellent tool. It is useful for people that are not so up-to-date with application patches and for applications that the user does not use often.

Monday 26 April 2010

Practical 1.1 & 1.2

Practical 1.1

Rss reader is a useful tool in bringing users update-to-date updates on websites/blogs/etc.
It is useful as it does not need the user to go to the website to check for the updates themselves and also, it is easy to use.

Below is the tutorial I used to learn how to use Rss reader.


Firstly, users will have to sign up with Google reader.
http://www.google.com/reader

Next, click add a subscription and add a subscription of the user's website which he wish to receive updates on. (Shown by the red text in pic below.)

It will appear under Subscriptions.
(Shown by blue text.)


(Click on it for a clear view)

Practical 1.2

The purpose of this practical is to provide examples of the type of information that attackers can gather using search engines. Google Reconnaissance is used by these attackers to retrieve unprotected information or information that is able to be used in an attack.

First, I used Google search engine under advance search, I searched for "login:*" and "password=*" file type Microsoft Excel files. The asterisk (*) means wildcard and documents that contain words login and password are shown.


Note: Only the password is being censored off by the asterisk.

Next, I search for "index.of passlist" which would provided me with documents which would show the login names and passwords. However, I was unable to find any of such things. The closest I was able to find was this.


Basically I learn that these attackers could make use of search engines to search for other people's private information to use it against them. Such information being appeared on the net is risky as it might involve information like Bank account pin numbers and credit card numbers.