Sunday 22 August 2010

11-3: Using TrueCrypt

11-3: Using TrueCrypt

For this practicals, we will be using third party applications that can be downloaded to protect files with cryptography.

Download the application from here.

After downloading, install the program.
Run TrueCrypt and click No to skip tutorial.
Click 'Create Volume'.


Select 'Create an encrypted volume file container'.


Click Next until Volume Size.
Put Volume Size as 1MB and click Next.


Click Next till you reach Volume Format.
At Volume Format, move your mouse for at least 30 seconds to ensure that you will get a strong encryption keys.
Click Format and we have done creating the volume.


Now we are going to mount the contain as a volume.
At the main windows, select an empty drive letter.
Click 'Select File' and navigate to where the container is saved.
Click 'Mount'.
You should get the end result as the picture below.


Remember Encrypted.docx and Not Encrypted.docx?
Save this two files into the TrueCrypt container.
Open them from the container.
Is there a differences in the time to open these two files?
After you are done with this, click 'Dismount' to stop the container.

I think this is quite safe as this is like a hidden folder to keep files just that in this case it is a hidden volume. It also encrypts files that are placed in this volume.
11-2: Using Microsoft's Encrypting File System (EFS)

11-2: Using Microsoft's Encrypting File System (EFS)

In this practical, we will be learning how to use Microsoft's Encrypting File System
(EFS).

EFS enables files to be transparently encrypted to protect confidential data from attackers with physical access to the computer. (Wikipedia)

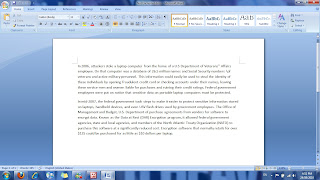
First, create a Word document with the following text in the below picture.

Save the document as Encrypted.docx and another time as Not Encrypted.docx

Right click the Encrypted.docx and click properties.
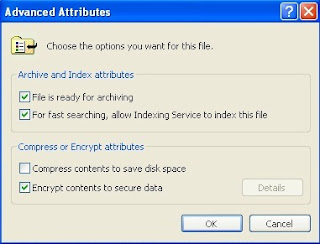
Click Advanced button in the properties window.
Tick the 'Encrypt contents to secure data'.


Now open both documents.
Which document open fast?
Was there a delay opening Encrypted.docx?

11-1: Installing Hash Generators and Comparing Hashes

11-1: Installing Hash Generators and Comparing Hashes

In this practical, learn about different hash generators that generate different hash values and compare them.

First, go to http://md5deep.sourceforge.net/
Download md5deep.
I suggest you download into a easily accessible place as this practical would use command prompt.

Extract the contents in the file.
Then create a Word document with content inside, "Now is the time for all good men to come to the aid of their country."
Save this file as Country1.docx in the same folder as the extracts of md5deep.

Using command prompt, navigate to the place where you store the extracted files.
Type in md5deep Country1.docx and press enter.
It will show you the hash value of Country1.docx
Next, try md5deep md5deep.txt and press enter.
It will show you the hash value of the md5deep.txt
Next, remove the line you typed in Country1.docx and save it as Country2.docx
Do the same step as what we did for command prompt for Country1.docx
It will generate the hash value of Country2.docx


We can go on to try the other hash generators.
Example, type in sha1deep for SHA-1
sha256deep for SHA-256
whirlpooldeep for whirlpool

From trying all these different generators, I see that the length of each hash value generated by the different hash generators are different. They also use a hexadecimal number system for the hash values.

8-5: Use an OpenID Account

8-5: Use an OpenID Account

Continuing from the previous practical of creating an OpenID account.

Started off with going to livejournal.

Inside the text box which ask for your OpenID, type in your OpenID and click login.


Then it will ask you to verify whether that is your OpenID and just click allow.


Then for the next website.
It would be here.
Just do the same steps as for how we did for livejournal.


I think this is great as we do not need to type in our passwords to login if we are afraid that the website have keyloggers.

8-4: Create an OpenID Account

8-4: Create an OpenID Account

This practical and the next practical are closely related.

First, go to https://pip.verisignlabs.com/.
Click get started and create an account.

Under My Account, this is where you find your OpenID.

8-1: Use Cognitive Biometrics

8-1: Use Cognitive Biometrics

For this practical, we would be learning on using cognitive biometrics.

First, I went to http://www.passfaces.com/demo/.
You do not need to key in any information in order to enroll.

At introduction to passfaces, click next until you get to this page below.


At that page, try to remember the 3 faces that they have given to you. These 3 faces would be like your password.
After memorizing, click next.

You will come to a page with 9 faces.
Now, try to find the face that you memorized.
Only one out of the nine faces is the correct face.
When you get the correct face, you would go on to the next set of faces.
However, if you made a mistake, you would have to start all over again.


I find it as a well secure method instead of using passwords to enter accounts but in this demo that I have done, if I cannot remember the face, it would slowly give me hints like shaking the picture of the correct face. This would be like revealing to the hacker of which is the correct "password".

7-2: Download and Install a Password Storage Program

Practical 7-2: Download and Install a Password Storage Program

In this practical, I would be learn how to use a Password Storage Program.
A password storage program is used to store all your passwords for any accounts that you have so that you would not need to memorize all of them.

First, I went to http://keepass.info/.
And download and run the installation file.
After installing the program, run it and click file then new.
A new windows box would appear.
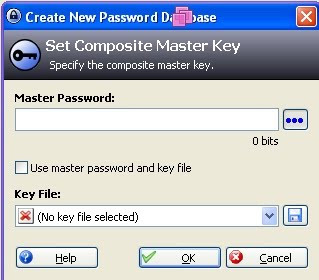
This window box would ask you to have a master password.
This master password would allow you to access your database of all your passwords.


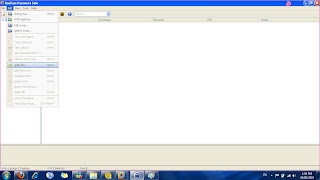
After setting the master password, a new window box would appear.
This would be the database of all your passwords.
Under edit, click new entry.


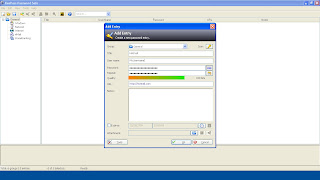
Another window would appear.
This time fill up the information they ask.
For example we want to fill in information on our hotmail account.
Lets say for under title, we call it hotmail.
Then for username, would be our username.
And so on and so forth.
This is shown in the picture below.


When you are done with the settings, click ok.
Now we have come to the easiest part.
Under URL, just double click it and it would open the web browser to the website.
All you have to do is to click your username and password on the keepass program and drag it into the respective text box at the website.
That's all for this practical.

7-1: Using Rainbow Tables

In this practical, I would be using Ophcrack which is an open-source password cracker program that uses rainbow tables.

What is rainbow tables?

A rainbow table is a lookup table offering a time-memory tradeoff used in recovering the plaintext password from a password hash generated by a hash function, often a cryptographic hash function. (Wikipedia: Rainbow Tables)

Doing this practical, I download ophcrack from here.

During the installation of the program, they will ask you to download and install the "tables".
Download the "table" that correspond to your version of Windows.
The "table" would appear inside the black box of the ophcrack.


Next go to http://www.objectif-securite.ch/en/products.php
Scroll down and under Demo.
At the password text box, type in the password as 12345 and click submit.
This would generate a hash of your password.
A hash would be made up of a string of letters and numbers.


Now, back to the ophcrack, click the Load icon and click the single hash option.
Copy your hash that was generated at the website and paste it into the text box at the Single hash option.
Then click ok and let the program run.


Depending on the complexity of your password would determine the amount of time it would need to crack your password.
If it is as simple as this example "12345", it will take seconds to crack it.


This is useful to test out your password to see how "strong" your password is.